Pages

Monday, July 26, 2010

Product Spotlight - Sweet November Stamps

Welcome back to Stamp and Create!
We have another great Product Spotlight for you this week.
But before we get to that, just a reminder that I am on vacation until July 31st. My husband is attempting to get stamp orders out, but since he's new at it, some orders orders may not go out until after I return on Aug 2nd - He DID get all weekend orders out, though!! (I'm proud of him :-).
All orders received from Friday, July 23rd-Aug 1st will be entered into a special drawing for a $25.00 gift certificate (this is separate from the regular July Customer Rewards drawing - so qualifying orders will actually be entered into both drawings)!!

This week's Product Spotlight is: Sweet November Stamps!! Amy Young has illustrated the most adorable mermaids and pixies!!
All Sweet November stamps will be on sale for 25% off through Sunday, August 1st.

Here are the awesome samples from the Design Team...
Lacey used Darby and Bumbles (although I left Bumbles off of the card),Crystal Stickles, Cameo Primas, Fairytale Primas, and Mini Roses. The awesome bow is white silk ribbon using the awesome Bow Easy.
Chris used the Image Pearl Tidepool and Seamoor for her circle easel card. She also used the sentiment from Popcorn Bears Thanks A Bunch, Fancy Tags Nestabilities, Big Scalloped Ovals and blossoms nestabilities on her card.


Jeanette has used Shimmer Redkelp from the amazing new mermaid line to create a 6x6 notebook. The image has been colored with copic markers and she has used Shimmerz in Angel Wings to add a little sparkle to her sand dollar belt.

Sharon used the image Darby and Skip. The bow is made with May Arts silk ribbon and the Bow Easy. She also used Tim Holtz word sticks and Kaiser pearls.

Sweet November image...Darby & Penelope DP by Kaiser Craft...La Di Da & spritz...baby breath. also used satin ribbon, bling, computer generated sentiment and hand stitched the border for the monthly challenge. colored her image with her copics and created her own wall for them to sit on.

Don't forget about our Monthly Challenge: Stitching/Sewing.

Stamp and Create will be sponsoring the following challenges this week:
Midnight Madness (starting Tuesday)

Happy stamping and shopping!!
~Lacey

Friday, July 23, 2010

Bow Easy Pictorial

If you love ribbon and bows, I am about to introduce you to one of the most amazing tools ever invented to help us make beautiful bows, time after time, without fail. It's a funny looking little piece of plastic, but wait until you use it! Now it's a little tricky to figure out, which is why I've created this pictorial for your use. I know I had a hard time at first, so it sat unused until I was able to figure out the exact way to use it. I don't want that to happen to you!! The biggest key to mastering this tool is practice. So play around with it. You can use the same piece of ribbon to keep practicing so there is no waste. Just untie your bow and start again!
I've got to tell you that my favorite ribbon to use with the Bow Easy, is the silk ribbon from May Arts. Lacey has a gorgeous assortment of colors in stock just waiting for you to take them home. Don't get me wrong, you can use any size or kind of ribbon with your Bow Easy. The silk ribbon is just my favorite, and that's what I've used for this pictorial.


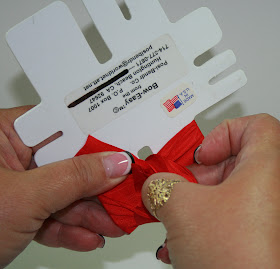
Start by choosing the size of the bow you want to make. Leaving a tail of the desired length, lay the ribbon across the Bow Easy as shown. Wrap the ribbon around the bow easy. As you can see in the next two pictures, I always make a double bow by wrapping the ribbon around the pegs twice.


After wrapping all the way around at least once, leave a tail however long you want on the other side, and cut your ribbon. I usually leave around four inches or so. You will learn what size tails you like, and how much ribbon you need to make your knot without having much waste when you're done.


Holding everthing tightly in your grasp, take your fingers and scrunch down the ribbon where the notch in the center of your ribbon is slightly exposed.


Again, keeping the ribbon taut with pressure from your hands, take the ribbon on top, keeping it straight with no twists in it, lay it across your hand where you can pinch the end.


Take the pinched ribbon and push it into the center notch


Flip your hand over and grab the end that is poking through the back.


Pull it through, keeping the ribbon straight without twists.


Flip your hand holding the Bow Easy back over so you're looking at the front of it again. Being careful to keep the ribbon straight, bring it up to the front of the tool.


Take your pointer finger up under the loop you just created by pushing the ribbon through the notch.


Take the tail and using your thumb, push the ribbon through the loop from your left to your right, and pull the tail under the loop.


It will look like this...


Grab the tail and start to pull it taut


Your ribbon (depending on the width) will be slightly off the Bow Easy, so just push it back down onto the tool.


Grab the tail again, and pull taut by pulling down toward your body first


Then finish it by pulling it tighter pulling away from your body.


Flip it around and look at the front of your bow to make sure you're happy with the way the knot looks. If not, undo it now and retie.


I always cut my tails while the bow is still on the tool. I just feel it's easier to be sure and get them the same length. If you like the "V" shaped tail, fold the tail in half and snip the tail to the desired length with your scissors.


When you're finished, using both hands, carefully slip your entire bow off of the Bow Easy, working carefully so you don't mess your bow up!! Voila! The perfect bow each and every time!


Hope you enjoyed this, and more than anything, I hope it has helped you understand this fabulous little tool!

For those of you who would like to see a video tutorial, check it out here.

~Sharon

Thursday, July 22, 2010

Vacation and TGF restocks

Welcome back to Stamp and Create!

Just a quick note to say that I am leaving friday morning for a vacation to visit family and will be gone for a week.
My husband is staying behind so he will try to ship out some of the more simple orders with just stamps and the bow easy.
Orders with flowers, ribbon, charms, paper, etc...will ship out on August 2nd when I return.
In the mean time, any order of $25.00 or more placed from Friday, July 23rd - Sunday, August 1st will be entered into a special drawing for a $25.00 gift certificate!
This is different than the July Customer Rewards gift certificate - so basically any qualifying order placed between July 23rd and August 1st will actually be entered into BOTH gift certificate drawings!!
Any order placed before Friday, July 23rd at 7am EST WILL ship out before I leave!!

I recently received a restock of The Greeting Farm Stamps along with some new designs to the store (at the request of a few customers)...

Plus...the original Cheeky Designs have now been released to all wholesale accounts!! These designs were originally only released to CHA Winter customers...

There will be a new Greeting Farm release on Sunday, August 1st. I have all of those stamps in stock and will have them loaded into the store on the 1st!

Make sure to check back tomorrow for a picture tutorial created by Stamp and Create Guest DT Sharon!

Oh, I will have my computer with me so I will try to respond to all emails while I am away.

In the mean time, make sure to check out the new Wags 'n Whiskers Challenge on Friday morning!!

Happy stamping and shopping!

~Lacey

Monday, July 19, 2010

Product Spotlight ~ Summer ~ Week 2

Welcome back stamping friends to Stamp and Create!!
We have more samples to share with you this week using the Product Spotlight stamps!!


But before we get to that, I wanted to mention that the High Hopes stamps have been restocked!


**Edited to add: CC Designs are now back in stock!!
Ok..back to the Product Spotlight...through Sunday, all stamps in the "Summer Category" will be on sale up to 25% off!


Here are the awesome DT samples using some of the stamps on sale this week...


Lacey Eleanor from Kraftin' Kimmie Stamps. To show the versatility of the new Basic Grey Oliver 12x12 paper pack, these papers work great for a "girly" card, too! Perfect for the Summer!! Also used is White Grosgrain ribbon, a Basic Grey button, and a bow created with the Bow Easy. This also fits the Stamp and Create Stitch challenge.
Joy

Joy used Honey Summer from CC Designs...mini prima yellow roses...shimmerz-butter cream on the roses...spritzed the entire the card with baby breath to give it a real shimmer.

Jeanette

Whiff of Joy 2010 - Page 118


Whiff of Joy 2010 - Page 120

Jeanette created an explosion box using two of the incredible Sweet November mermaids: Pearl & Seamor and Fanthom & Lio. She added tons of stickles to make them sparkle. She decorated the lid with a prima flower and delicate crochet lace. Inside the box, Fanthom is set amongst some swirling coral which was made using champagne net.

**these stamps are NOW back in stock!!**

Chris


Sharon created a card using the Kraftin Kimmie stamp Mae. Also used are Basic Grey Sugar Rush paper, May Arts silk ribbon along with the Bow Easy and a butterfly charm, Kaiser pearls, and Stickles.

Don't forget that all order of $30 or more placed over the summer will be entered into a drawing for a $25 gift certificate at the end of the month!!

Happy stamping and shopping!

Sunday, July 18, 2010

Kraftin' Kimmie, Whiff of Joy, and Basic Grey new releases

We have a few releases for you this weekend...
Kraftin' Kimmie Stamps release the most adorable and fun fairytale images last night along with some fun Miles Mouse stamps, too...

Plus Whiff of Joy just released 5 new Summer images illustrated from both Allison Action and Elizabeth Bell...

As a reminder, the new Basic Grey Oliver and Olivia lines are now instock...
I was able to play with the new Oliver 12x12 paper pack...
Don't forget about the Summer Product Spotlight Sale!!
Happy Stamping and Shopping!
~Lacey

Saturday, July 10, 2010

Product Spotlight Summer

Welcome back to Stamp and Create.
We have a new Product Spotlight for you! For the next 2 weeks all stamps in the "Summer" Category will be up to 25% off.
The awesome Design Team have some samples to share with you this week using some of the stamps that are on sale...
(Make sure to scroll all the way to the bottom for the product updates)

This is Lotti from The Greeting Farm. Lotti has been retired from TGF, but I still have a few in stock. Other products used: Heidi Swap Rhinestone Circles, White Silk Lace. I also used some embroidery floss to "stitch" up the tear so this qualifies for the Monthly Challenge as well!
Sharon
Jeanette Jeanette used Kraftin Kimmie's Florence to create this summer beach card. The paper is Basic Grey's Green at Heart and she used May Art's Champagne Net ribbon. The sentiment is from TGF Roll Call stamp kit and she colored in Florence's sunglasses with stickles.
Joy Joy used TGF Rain, Snow, Shine and some mini prima yellow roses. Joy added some faux stiching around the corners for the Monthly Challenge.
Chris Chris used the adorable summer image from Stampavie called Josephine in the Watermelon Patch. She also used ivory crocheted lace, Basic Grey Indian Summer and Green at Heart dp.
We have a Guest DT with us this week...my daughter Ansley!!
Ansley stamped and colored Chillin' Out herself. She also wanted to participate with the Monthly Challenge, so she added some faux stitching as well!
The Whiff of Joy newest Store Kit is now available!! I also have the newest release which will be available on July 18th. (I was told I was allowed to peek these today since the sneak peeks start today :-). I have these already in stock and will add them to the store on the 18th!

My Basic Grey Oliver and Olivia products are on their way and will be here on Tuesday. I have already added them to the store, but they will not ship out until Wednesday. I have 12x12 and 6x6 paper packs, Glazed and Stitched Brads, Epoxy Clips, Buttons, and some fun stamps!! Click here to see them all.

Happy Stamping and Shopping!